Step 1
Login on your Tomato router.
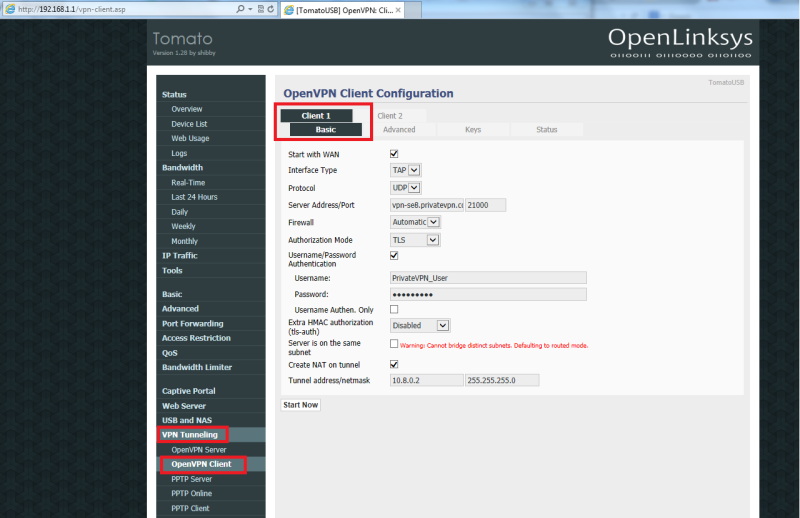
On the left menu of the page, click VPN Tunneling, then click the OpenVPN Client.
Click on Client 1 and then Basic. Enter following values:
- Check the box for Start with WAN.
- Set Interface Type to: TAP
- Set Protocol to: UDP
- Set server address from this server list here: Server list , for example se-kis.privatevpn.com
- Set Port to: 21000
- Set Firewall to: Automatic
- Set Authorization Mode to: TLS
- Check the option for Username/Password Authentication.
- Enter your PrivateVPN user name and password in the appropriate fields.
Username Authen. Only should be unchecked.
If you have Server is on same subnet then uncheck it and check Create NAT on tunnel. If you don’t have Server is on same subnet and just check Create NAT on tunnel.
Step 2
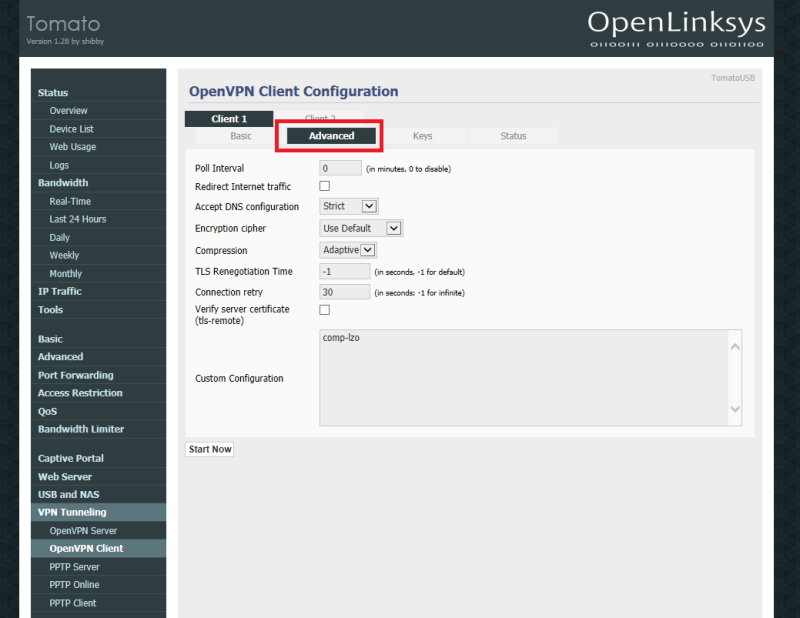
Now click on Advanced and enter following settings:
- Set Poll Interval to: 0
- Redirect Internet traffic should be unchecked.
- Set Accept DNS Configuration to Strict
- Set Encryption Cipher to: Use Default
- Set Compression to: Adaptive
- Verify Server Certificate should be unchecked.
- Enter following text in the Custom Configuration box: comp-lzo
Step 3
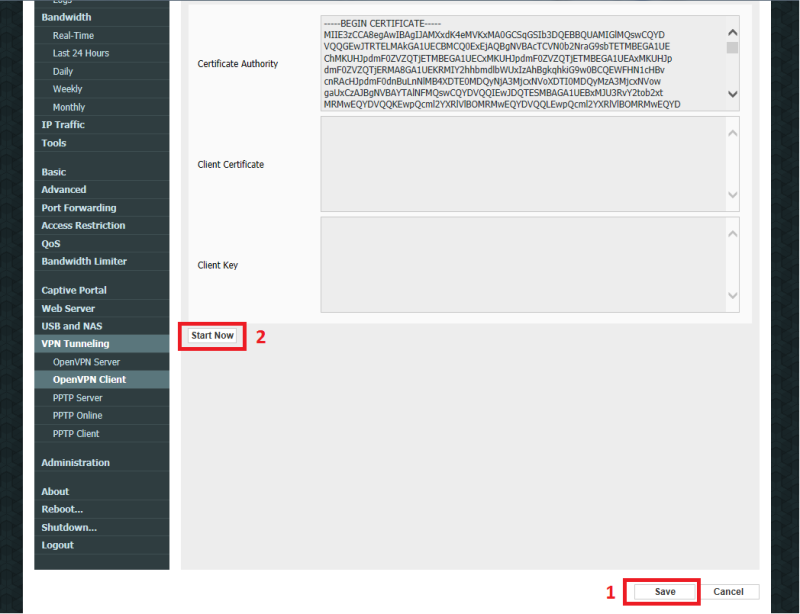
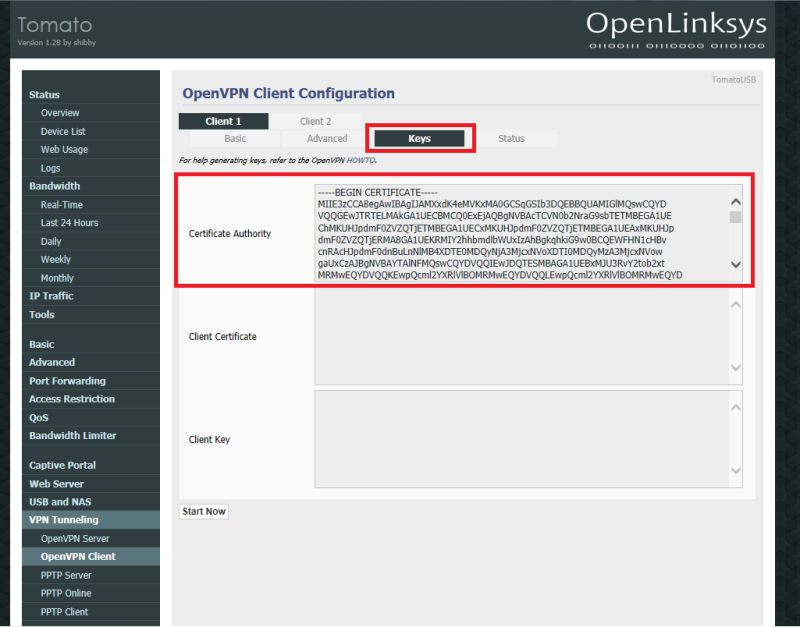
Now click on Keys and enter following value for Certificate Authority:
—–BEGIN CERTIFICATE—–
MIIE3zCCA8egAwIBAgIJAMXxdK4eMVKxMA0GCSqGSIb3DQEBBQUAMIGlMQswCQYD
VQQGEwJTRTELMAkGA1UECBMCQ0ExEjAQBgNVBAcTCVN0b2NraG9sbTETMBEGA1UE
ChMKUHJpdmF0ZVZQTjETMBEGA1UECxMKUHJpdmF0ZVZQTjETMBEGA1UEAxMKUHJp
dmF0ZVZQTjERMA8GA1UEKRMIY2hhbmdlbWUxIzAhBgkqhkiG9w0BCQEWFHN1cHBv
cnRAcHJpdmF0dnBuLnNlMB4XDTE0MDQyNjA3MjcxNVoXDTI0MDQyMzA3MjcxNVow
gaUxCzAJBgNVBAYTAlNFMQswCQYDVQQIEwJDQTESMBAGA1UEBxMJU3RvY2tob2xt
MRMwEQYDVQQKEwpQcml2YXRlVlBOMRMwEQYDVQQLEwpQcml2YXRlVlBOMRMwEQYD
VQQDEwpQcml2YXRlVlBOMREwDwYDVQQpEwhjaGFuZ2VtZTEjMCEGCSqGSIb3DQEJ
ARYUc3VwcG9ydEBwcml2YXR2cG4uc2UwggEiMA0GCSqGSIb3DQEBAQUAA4IBDwAw
ggEKAoIBAQC/H+vc6QChwv2fj5XLzQcO05b3zIpPqQWsKunWyLnKUybFz79pUfhv
07L9arJj2LPwW0DVcyl9dxUWgqJOcWG5UrwYWF3ZDlGHkJywH5XKpnmdiqR8kkPi
atGm28aMpYIOvP+uIFrMD509cZONC0WIyVUrV9tpRX7LfKBti509ifPH+tINm5R9
B9dMQJKBI951wYXD8cCBodXsan++yOzuazkKHn1U1tY3TdqdIyD2HiBUbXhSH86w
fAmvY/O7L6f+YHzyI4hHseLzEo9htbaOQLvtg57cr2eBl2K46qiDwKn2q1aiJ2kx
uNkK1Q1uYAUzdyJHUsbbg+FZFxra8uAxAgMBAAGjggEOMIIBCjAdBgNVHQ4EFgQU
cLPgc+zc/6yPLEOKVPL62EW9rLAwgdoGA1UdIwSB0jCBz4AUcLPgc+zc/6yPLEOK
VPL62EW9rLChgaukgagwgaUxCzAJBgNVBAYTAlNFMQswCQYDVQQIEwJDQTESMBAG
A1UEBxMJU3RvY2tob2xtMRMwEQYDVQQKEwpQcml2YXRlVlBOMRMwEQYDVQQLEwpQ
cml2YXRlVlBOMRMwEQYDVQQDEwpQcml2YXRlVlBOMREwDwYDVQQpEwhjaGFuZ2Vt
ZTEjMCEGCSqGSIb3DQEJARYUc3VwcG9ydEBwcml2YXR2cG4uc2WCCQDF8XSuHjFS
sTAMBgNVHRMEBTADAQH/MA0GCSqGSIb3DQEBBQUAA4IBAQA0UbskTX1IX6NLfAs3
8gPj321zN2ryj3ADxS8sLjy/+hUbdHu3FyQ12pI7jIVeAK4n7DccBRAMDBTWfNtv
jqFiWp10G2cI6d2xwDaDZFJNSWDyl4OYQjE4RtyBwH4IskKAdrT0oXg+kVgo8TiU
BwAvzuoZFWFHYYYhfCh9bGdicLCtBfiZ6zjlAltjVA0tjdbYCG5WkPqsXAUeKBmf
oQ5n10nzGdkZSMwlp9g5tFfni9kq/oSAupS5XXyvUG3IpFsdZWuZUo6fr5Hp6Ve5
Yvux4/hgnPLuT8E/46EKkATabVnpNa3/CgSqiJLEd4m6ZUiykqI7Hq3juKkK6DrT
ilw/
—–END CERTIFICATE—–
Step 4
Now scroll down and click on Save and then Start Now.
Wait 10 seconds and after that you should be connected.