
NextCloud puts your data at your fingertips, under your control. You store your photos, calendar, contacts and documents on a server of your choosing, be it at home, a rented server or at one of our providers. Your existing data can stay at that FTP drive at work, Dropbox or a NAS you have at home, while you get at it through NextCloud.
A trusted solution giving you access to all data you care about in one convenient place!
The tutorial was prepared with our “CentOS 7” template and is meant to work on our self-managed virtual private servers.
0. Preliminary requirements:
“CentOS 7” template installed on server;
Fully updates server software (yum update);
“Nano” text editor installed (yum install nano -y).
1. MariaDB installation
yum install mariadb-server
Enable MariaDB to automatically start after server reboot:
systemctl enable mariadb
Start MariaDB:
systemctl start mariadb
Now run the post installation security script:
mysql_secure_installation
When script asks you to enter MariaDB root password, press enter because you have not set the root password yet. Then enter y to set the root password for MariaDB server. And proceed with Enter press to answer all the remaining questions.
2. PHP 7 installation
Since PHP 7.1 is not yet packaged in official repositories for the major distributions, we’ll have to rely on a third-party source. We will be using Webtatic YUM repository:
 sudo rpm -Uvh https://dl.fedoraproject.org/pub/epel/epel-release-latest-7.noarch.rpm
 sudo rpm -Uvh https://mirror.webtatic.com/yum/el7/webtatic-release.rpm
Install the new PHP 7 packages from IUS repository:
yum install -y mod_php71w php71w-cli php71w-common php71w-gd php71w-mbstring php71w-mcrypt php71w-mysqlnd php71w-xml
Restart Apache to load the new version of PHP:
systemctl restart httpd
3. Creating MariaDB database and user
Login to your MariaDB:
mysql -u root -p
Create database:
CREATE DATABASE nextcloud;
Create user:
CREATE USER nextclouduser@localhost IDENTIFIED BY 'your-password';
Grant privileges for user and exit:
GRANT ALL PRIVILEGES ON nextcloud.* to nextclouduser@localhost IDENTIFIED BY 'your-password';
FLUSH PRIVILEGES;
exit;
4. Enable Binary Logging in MariaDB
nano /etc/my.cnf
Add the following three lines in [mysqld] section:
log-basename=master
log-bin
binlog-format=mixed
Restart MariaDB:
systemctl restart mariadb
5. Download NextCloud files:
Download latest NextCloud package:
wget https://download.nextcloud.com/server/releases/nextcloud-12.0.0.zip
Latest release can be found at: https://nextcloud.com/install/#instructions-server
Extract it:
unzip nextcloud-12.0.0.zip
Move files to your Apache directory:
mv nextcloud/* nextcloud/.* /var/www/html/
6. Setting strong directory permissions
Create “permissions.sh” file:
nano permissions.sh
Insert the content:
#!/bin/bash
ncpath=’/var/www/html/’
htuser=’apache’
htgroup=’apache’
rootuser=’root’printf “Creating possible missing Directories\n”
mkdir -p $ncpath/data
mkdir -p $ncpath/assets
mkdir -p $ncpath/updaterprintf “chmod Files and Directories\n”
find ${ncpath}/ -type f -print0 | xargs -0 chmod 0640
find ${ncpath}/ -type d -print0 | xargs -0 chmod 0750printf “chown Directories\n”
chown -R ${rootuser}:${htgroup} ${ncpath}/
chown -R ${htuser}:${htgroup} ${ncpath}/apps/
chown -R ${htuser}:${htgroup} ${ncpath}/assets/
chown -R ${htuser}:${htgroup} ${ncpath}/config/
chown -R ${htuser}:${htgroup} ${ncpath}/data/
chown -R ${htuser}:${htgroup} ${ncpath}/themes/
chown -R ${htuser}:${htgroup} ${ncpath}/updater/chmod +x ${ncpath}/occ
printf “chmod/chown .htaccess\n”
if [ -f ${ncpath}/.htaccess ]
then
chmod 0644 ${ncpath}/.htaccess
chown ${rootuser}:${htgroup} ${ncpath}/.htaccess
fi
if [ -f ${ncpath}/data/.htaccess ]
then
chmod 0644 ${ncpath}/data/.htaccess
chown ${rootuser}:${htgroup} ${ncpath}/data/.htaccess
fi
Run the file:
bash permissions.sh
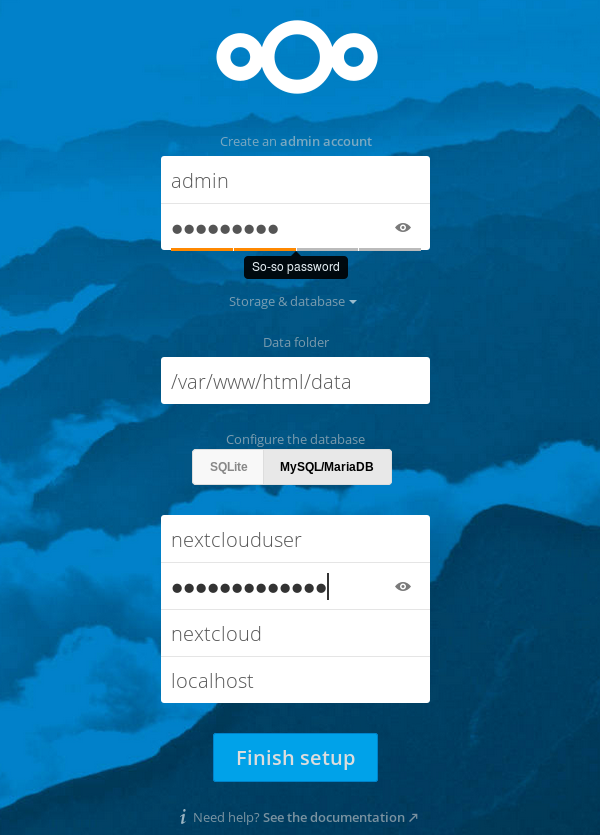
7. NextCloud installation
Open your server hostname or IP address in browser and finish the installation.
More information about NextCloud project can be found at: https://nextcloud.com/